tabs

Dec 13, 2014

Easy key chains- great teacher gift


These are so easy to make- your kids could even help.  And what teacher doesn't need a key chain?
click for tutorial...

Dec 6, 2014

a frame? a clipboard? or both


Is it a frame? Is it a clipboard?  I'd say it is both.  I created these easy items a while back but felt they were worth sharing again.  


They are just a piece of 2x6 wood cut to appropriate height.  Add a finial to the top then glue on a clothespin.


Lastly personlize it with glaze or paint, some fabric rosettes, buttons of whatever strikes your fancy.  These would be easy fun gifts for friends or even teachers.

Nov 15, 2014

Flower Pot Nutcrackers?


At work I was charged with creating these silly guys using clay pots, paint and accessories.  Just a bit of fun for the holidays.  Can you imagine making them out of huge pots? 

Nov 1, 2014

Silver trays rethought.


Trays are usually for holding food - or jewelry.  But here is a new twist.  Use them as wall art. 


Just something to be said for old, shiny silver. 

Oct 18, 2014

The Theme is Water


A blog was doing a water theme for art.  I combined some favorites- mason jars and flowers.
click for tutorial...

Oct 4, 2014

Boingo Pumpkin


We have all seen various types and takes on pumpkins this season.  There are fabric ones, plastic ones, real ones and paper ones.  But have you seen one on a spring?  - kinda like Tigger from Winnie the Pooh ready to pounce.

Well I have tons of these springs- yes the previous owners left me a rather ratty sofa and well- my dog chewed it up more than I'd care to share and right before I was going to have my brother-in-law haul it to the dump- my sister said, "cut out the springs and save those.  You might find something cool to do with them."  My sister is a junk nut.  She will pick anything up and try to see a way to repurpose it.  She is not too cool to dumpster dive- no sir. She was right- I ended up using them.

I did two in this fun orange pattern.  It is paper napkins decoupaged over a paper mache pumpkin.  Then I tied some of my hand-stained, hand stamped Halloween ribbon to the spring. 
Aren't you just bouncing to have this?

Sep 27, 2014

A Canvas Beauty.

Have you heard of the Graphics Fairy? 


 If not then you are missing out on an amazing source of free graphics.  I use them as is or for inspiration for other projects.  This is a project I used as is.  I transferred a graphic to a canvas. 

Imagine all the things you could do here..graphics, original child's drawings or even photographs. 
What do you want to make?

click for tutorial....

Sep 20, 2014

Welcome and glad to meet you.

I had a blog before and a different business name.  If you care to access the old then you'll find it at Whimsy Art Studio.  This blog is along the same vein- artwork, creations and a little bit about me.

This is where I create.


I live in a historic house- built in 1898.  In a small town of all historic homes.  The town throws a big Antique fair twice a year and my sister and I set up a booth and sell our items.  I'll share more of that later on.  I had to put this photo first - my neighbor took it and I love the whole streetscape.


Above is a better - more springy shot of my home.  Love it so much.  It is a whole work in progress but then that is pretty much life right? 

I am an avid gardener- well I read books better than garden but I do love hydrangeas and other flowers.


This is my youngest baby- Penelope.  I just adopted her a few weeks ago.


This is her big sister Daisy.  My sidekick.  The two of them keep me busy and are the loves of my life. 

Still want more info then feel free to visit my About page. 

I can't wait to share my creativity and life with everyone. 


Jan 3, 2014

How to paint tutorial


There is no right way or wrong way.  This is just how I did this painting. 

1.  This first shot is after I had base coated the canvas with black gesso, drawn the image on and started painting the background color.


2.  In this picture I have filled in most areas with color.

 
3.  Adding shadows and highlights.


4.  Continue to add detail.


5.  At this point, I collaged on polka-dots, added colored pencil and also watercolor crayons.


The finished painting with some antique glaze and some rubber stamping. 


Jan 1, 2014

Modge Podge Key Chains


Everyone loves personalized key chains.  These are easy and fun.  Step by step tutorial.

1.  Find pieces of wood you wish to use and make sure they have a hole in them.  You can cut your own or buy nice balsa wood shapes at any craft store.


2.  Cover with scrapbook paper and add any decorative embellishments or text you want.


3.  Attach the key chains to the wood and then cover with Modge Podge Dimensional Glaze.


4.  Once the glaze is dry it is finished.  Easy to do.


Canvas of beauty tutorial


One of my favorite blogs is the Graphic's Fairy.  She spends so much time finding awesome graphics that she then lets everyone use.  I took one and did the beautiful canvas. Then I was featured on her blog: The Graphics Fairy.  And here is the tutorial to show you how to create the same thing - using any graphic you might want to use.   I did a transfer using one of her images and then doing it by using a gesso and a copy machine image.  It just transfers the ink from the paper to the canvas.

Step by step process:

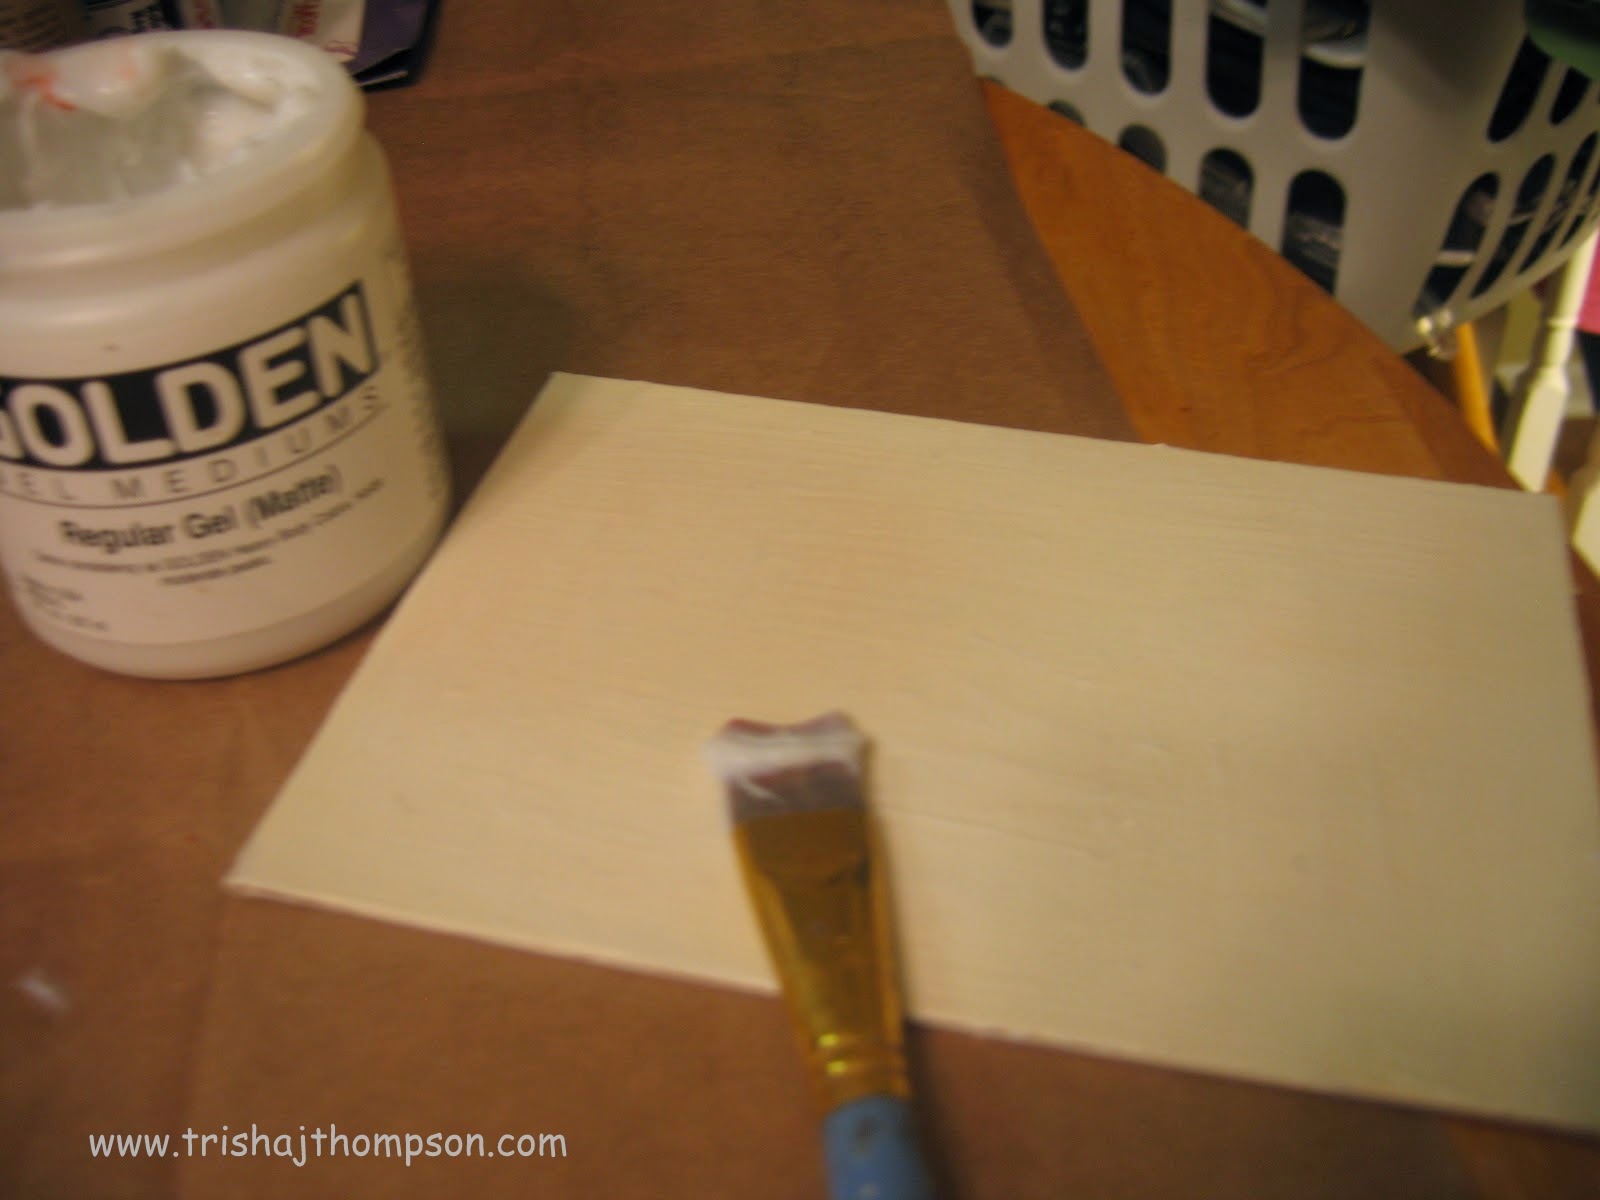
1. Paint various shades of brown on the canvas.


2.  Paint over the top of that with one to two coats of cream paint.


3.  Once that is completely dried put one coat of Matte Gel Medium on it.  


4.  Make sure the coat is not to thick, about the thickness of spreading butter on bread. 


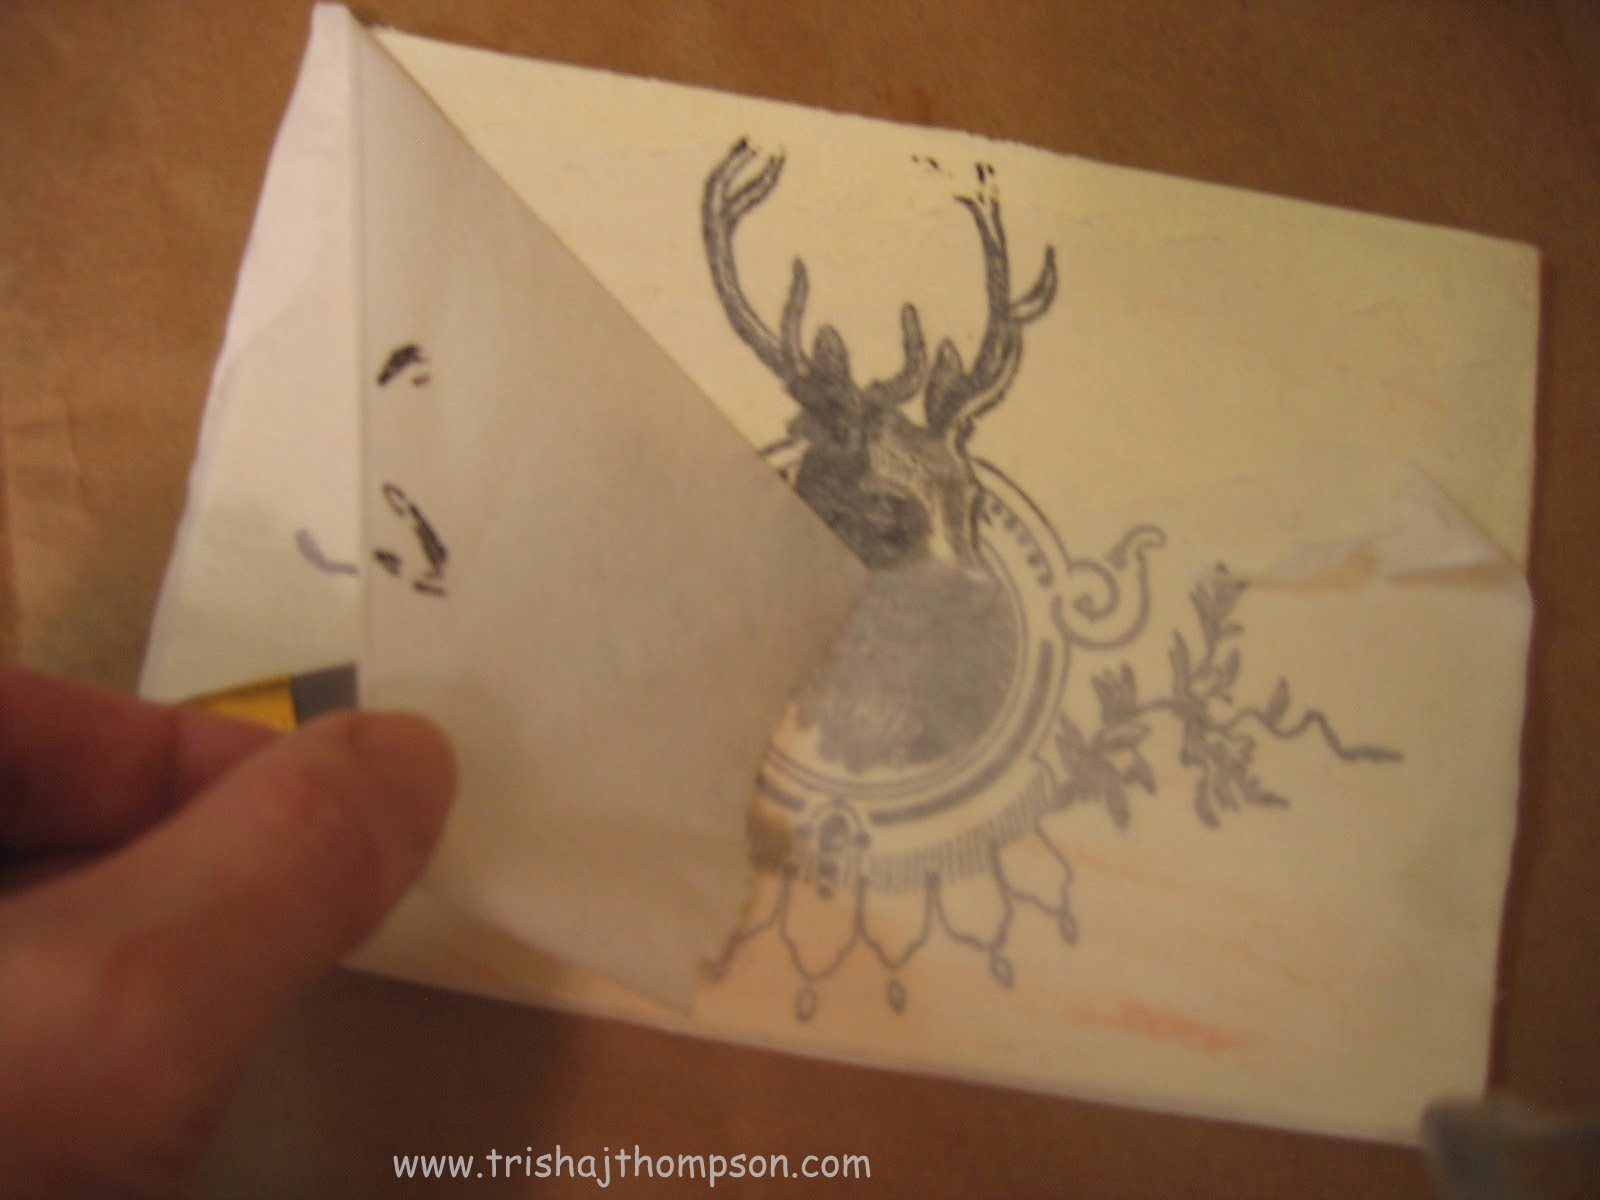
5.  Now you need a copy of the image you need to transfer.  It has to be a copy not a printed out on the printer.  I use staples to make the copies. Also, make sure if it has text it needs to have the mirror image so that it prints correctly. 


6.  Place your copy, image side down, onto the canvas.  Do this right after you spread the gel medium on.  It has to be done when the gel medium is wet.  Press the image down and rub away any air bubbles. 


7.  Let the canvas dry completely.  I usually let it dry overnight.  Once completely dry dampen with a wet paper towel, then use a brush to make sure you have the water everywhere. 


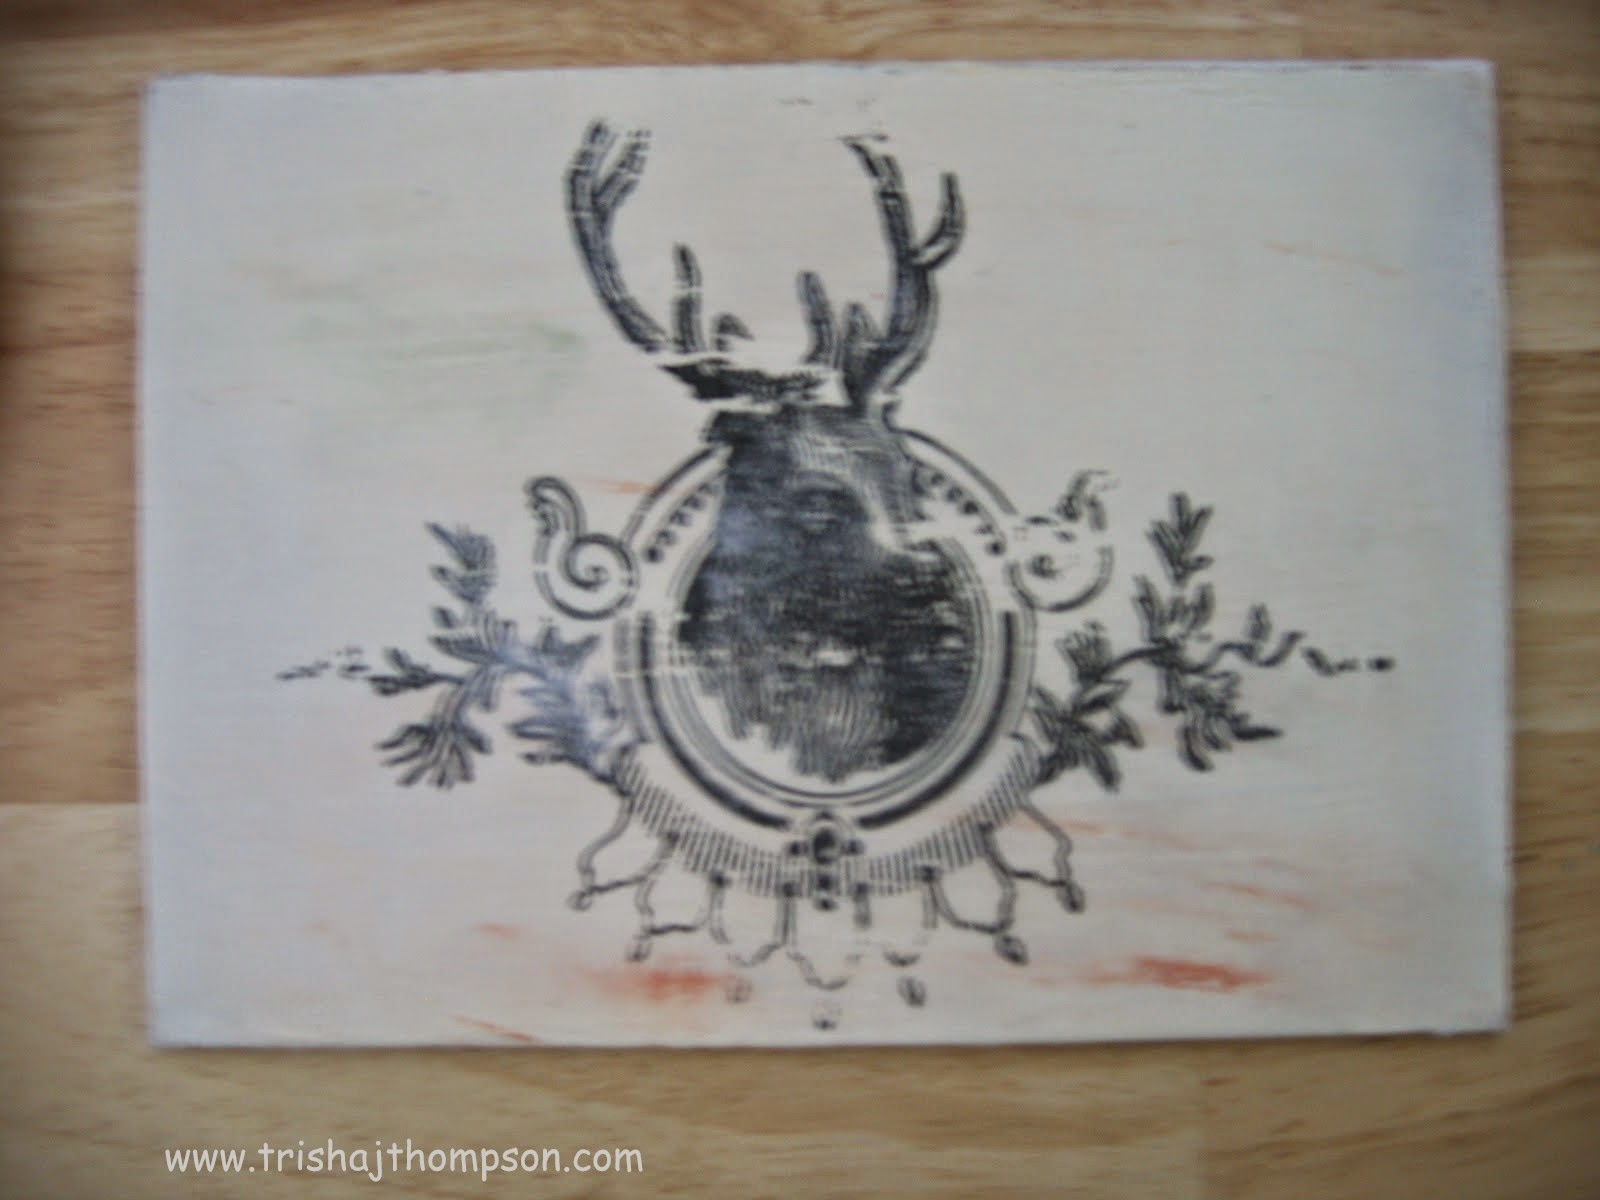
8.  Once damp start peeling off the paper gently.  The paper will peel off and leave the image on the canvas. 


9.  You may have to rub it a bit to get all the paper fibers off.     Once finished with that sand, antique, paint - whatever you want. 


10.  Go try it out. You can do them for all seasons.  Even try with a copy of your child's photo.